
Quickly See What’s Most Important by Customizing Your Individual Page
You can now arrange the Individual page exactly the way that benefits you most! If you’re looking through attributes all day, move it to the top of the page and cut out all the scrolling! You don’t care about the Involvement graph? Turn it off! You want to see the Last Updated dates for phone numbers and emails? Turn them on! Update how your page looks, and the changes will apply for you going forward.
The following abilities are now available on the Individual page:
- Move the various “cards” around in the order you choose
- Choose to hide specific cards if they aren’t relevant to your role
- Rearrange the information with the “Profile” card to only see the information you want to see
- Choose to show Last Updated dates for all communication and address data
- Choose to show comments for all communications and address data (not hidden behind the comment icon)
Just select the “More Actions” dropdown and choose “Edit Page Settings”. From there, you can update the settings for the Individual page on 3 tabs:
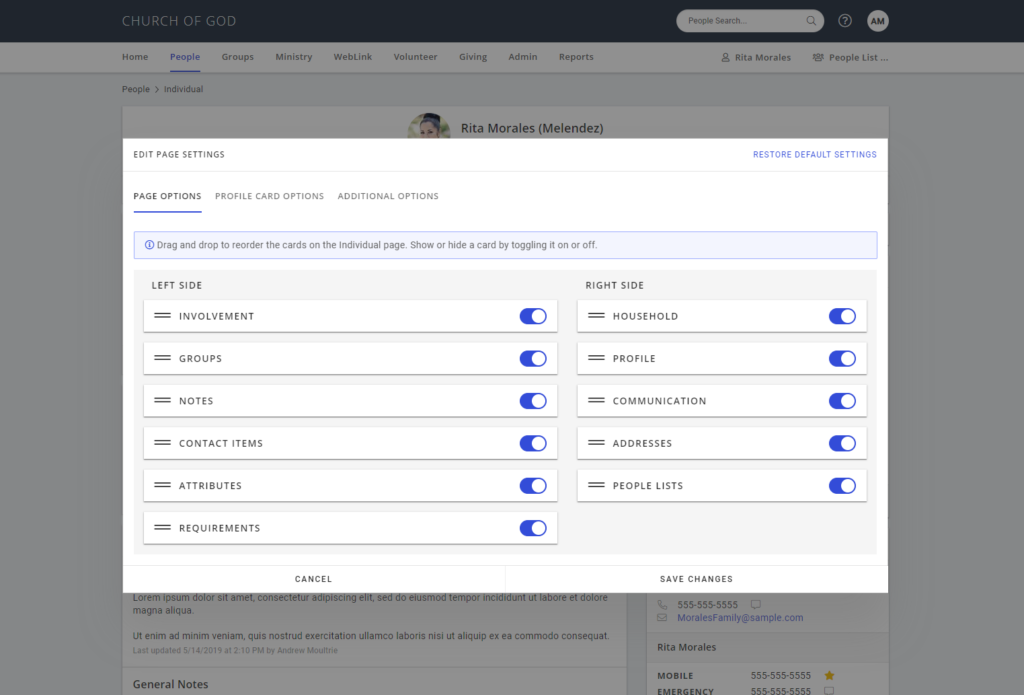
1. Page Options
From this tab, you can drag and drop each card to change the order they appear on the page and turns cards off if they aren’t relevant to your role.
If you’re performing a specific task on this page to work through a list of people, you can move the relevant cards to the top of the page while you’re working the list. Once you’re finished with that task, select the “Restore Default Settings” option to return the page back to its original state.
Pro tip: Combine this and the “Save Page View” option in the “More Actions” menu for even more customization. You can expand specific Attribute Groups, Requirements, or the Span of Care list and select “Save Page View” to keep them expanded or collapsed for future page views.
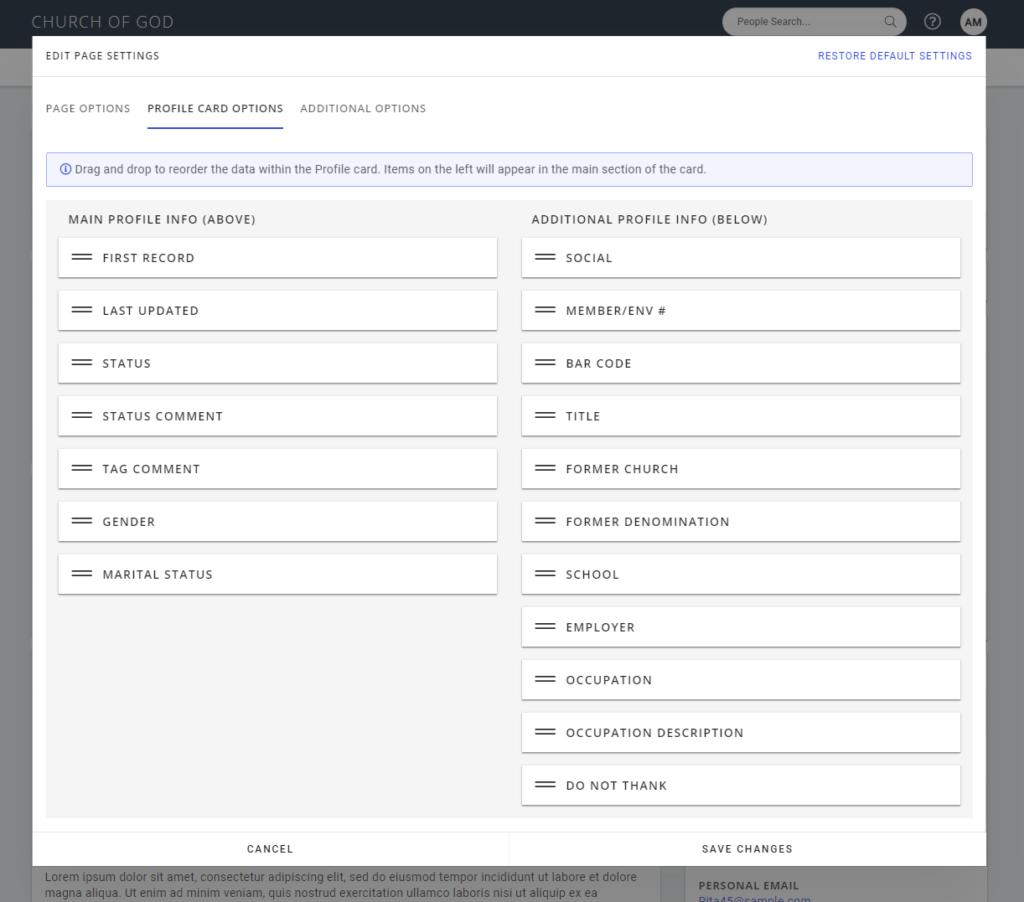
2. Profile Card Options
This tab enables you to choose which data appears in the main section of the Profile card (the section that’s visible by default when you land on the Individual page), and which data falls within the “Additional profile Info” section. You can update these settings by dropping values in the left column versus the right column.
You can also drag and drop each value to rearrange the order of the values within the card itself.
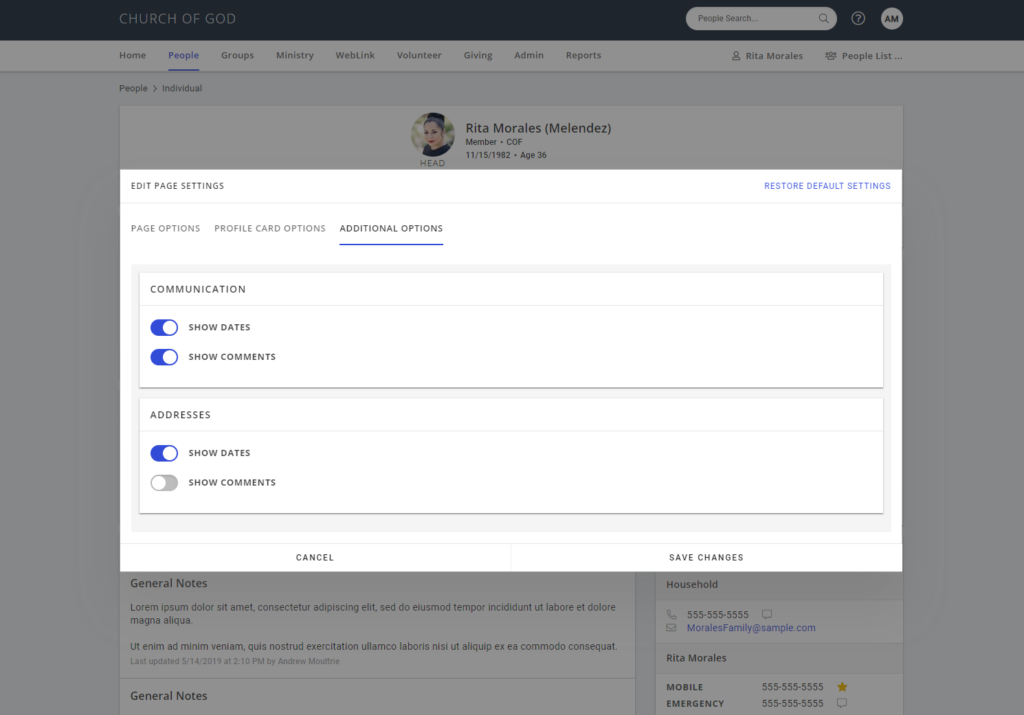
3. Additional Options
On this tab, you can opt in to see the Last Updated dates for communication and address information. This will enable users who need to see this information to view it without going to the Edit Individual page. By toggling on the “Show Comments” option, the comment for these values will be displayed within the card without having to hover over the comment icon.
Changing any of settings will only impact you, so you won’t impact what other users see when they view the individual page (even if they use the same computer as you). Plus, these settings will be saved for you no matter what device you use – go home and pull it open on your laptop or view it from your iPad, and voila, your custom view awaits.
Pages with a New Design
Included in this release are two Contacts-related pages with a new design:

1. The Enter Contact Form Page
We’ve kept the primary format of this page intact, and have introduced the following enhancements along with the updated design:
- The initial page to select a Contact Form has
moved to the Enter Contact Form page itself (now in the top-right of this
page).
- There is now a “Select All” option within the Contact Items section for any Contact Form that has three or more Contact Items to choose from.
- The Recent Contact Items data and formatting now matches what is seen on the Individual and Household pages – select the “Comments” to see all comments for each Contact Item.
- Contact items triggered by emails (including Confidential emails) can now be viewed in the Recent Contact items section (if your user has the appropriate security rights).
- The Individual or Household you are viewing now displays the same summary information that you see in the Header Cards on the Individual and Household pages
- The “Contact item Recipient” dropdown now has updated styling to more easily tell who the household members are versus the household’s visitors.

2. The View All Contact Items page
Like the Enter Contact Form page, the primary structure of the page is very similar, and we have introduced the following enhancements:
- The
information displayed for each Contact item now matches the information and
formatting of the Individual and household pages.
- The Individual or Household you are viewing now displays the same summary information that you see in the Header Cards on the Individual and Household pages
- The “Contact Items For” Filter dropdown now has updated styling to more easily tell who the household members are versus the household’s visitors.
- You can choose how many Contact Items you are viewing at one time
Save Time with Volunteer Pipeline Updates
This just in for the volunteer pipeline:
- As you work through applicants for a specific application, the application you’re working in will be remembered so you don’t have to select it again from the dropdown. This also applies for the Add Applicant page when you want to submit a volunteer application as a Portal user on behalf of an individual in your church.
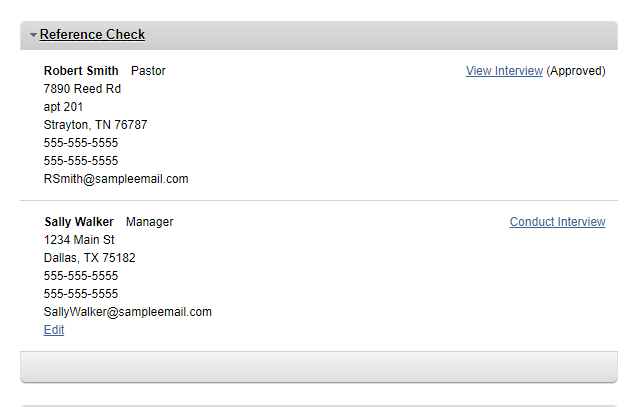
If you use Reference Checks for any volunteer applications (or might use them in the future!), you’ll be interested to know:
- You can now view the questions and answers that were recording during the reference check interviews. Just select the “View Interview” link on the Applicant Detail page to see the interview’s details. No more need to go to the Report Library for this information!
- You can now edit the contact information for someone’s references from the View Applicant page! This is super useful when a reference isn’t responding. Now you can update the name and contact information for that reference and reach out to the new contact instead.